Tuesday, December 27, 2011

Blue Cheese Dressing and BLT Salad

Husband approved "man salad"
Salad dressing is one of those things that I really hate to serve out of the bottle.  All the stabilizers, sweeteners and additives, ick!  Homemade dressings are so easy, and so quick, and made out of things you probably already have in your pantry - there's really no reason not to always have homemade.  Here's my version of blue cheese dressing - tangy, peppery, and creamy.

I never measure salad dressing, so I hope this approximations works. I used a large spoon out of my regular silverware for measuring these scoops.

Simple ingredients make for a super tasty dressing.
Ingredients

  • 4 heaping scoops of regular mayonnaise 
  • 3 heaping scoops of non-fat greek yogurt 
  • 4 dashes* of white wine vinegar
  • 4 dashes* hot sauce (Franks red hot, texas pete or tabasco work best)
  • 2 dashes* Worcestershire sauce
  • Juice of 1/2 lemon
  • Generous amount of fresh ground pepper
  • Kosher salt to taste
  • A bunch of blue cheese, at least 1/2 cup - I used the already crumbled blue cheese


*By dash - I mean a shake through a controlled bottle top.  If your bottles have open tops, just put your thumb over the top to control the flow, and shake away.

Mix well, cover, and refrigerate for 30 minutes to let flavors marry.

I used this dressing to make a Blue BLT salad for the the hubby and me for lunch. Just combine non-cured applewood smoked bacon, baby lettuces, and grape tomatoes with a bit of thinly sliced shallot, and some dollops of the blue cheese dressing with a little extra blue cheese on top.  Add a couple of slices of this homemade bread on the side, and you've got a super tasty and super fast lunch. The addition of grilled chicken would make this even better, or take it one step further and add chopped hard boiled egg and you've got a Cobb.


Homemade Bread, take 2

This went perfectly with my husband's homemade red sauce. 
It's been over a year since the last time I made it, but this bread recipe is just too good - it deserves an encore.  This time, I made it with regular all-purpose flour instead of whole wheat flour, and as much as I hate to admit it, the regular flour version was yummier..... truly like a rustic loaf that you'd buy at a bakery, crusty, airy, and oh-so-good.  I still had to add a little bit of extra water because my dough came out a bit too dry, but other than that, the recipe is spot on.

I hope you give it a try!

Christmas Morning Sticky Buns

If this is wrong, I don't want to be right.
While I love to cook, I really don't do much baking.  Perhaps it's my desire to 'wing it' with nearly all recipes that repels me. A novice really can't improvise when baking - you have to follow recipes very closely, or all those magic chemical reactions that turn seemingly lackluster ingredients into something spectacular, just won't happen.

I make an exception to my no-baing rule when Christmas comes around. I like to make a variety of cookies and pastries, and this year I added a new one to the repertoire - Sticky Buns.  My dad used to always make some sort of sweet baked good on Christmas morning (his sour cream coffee cake can't be beat!), so I had a hankering to make something for the husband and me to enjoy and sticky buns just seemed like a good idea.

This is a recipe by Bobby Flay, and in typical Flay Fashion, it incorporates honey and citrus.  While these did take quite awhile from start to finish, there wasn't really anything tricky to them. And wow, they were SO good, definitely worth it.  My dad would definitely approve.

Sticky Buns a lá Bobby Flay
Ingredients:
  • Softened butter for bowls and baking pan
For the glaze:
  • 1 cup light muscavado sugar (I just used used brown sugar since I didn't have this fancy one on hand)
  • 4 T unsalted butter
  • 1/3 cup honey
  • 1/4 cup freshly squeezed orange juice
  • 1 orange, zested
  • 1 cup sliced almonds, lightly toasted (I opted for pecans, since the hubs and I like them better, even though almonds probably mesh better with the other ingredients)
For the dough:
  • 1 package yeast
  • 1 cup warm milk (not hot, just warm)
  • 1/4 cup granulated sugar, plus a pinch
  • 1/4 cup unsalted butter
  • 1 1/2 teaspoon pure vanilla extract
  • 1 large egg yolk
  • 2 3/4 cups all purpose flour
  • 3/4 tsp salt
For the filling:
  • 8 tablesppons (1 stick) unsalted butter, softened
  • 1/3 cup granulated sugar 
  • 1 T ground cinnamon
  • (I also added a teensy bit of ground clove and nutmeg)
Hot out of the oven! Somewhat
different sizes, but they still taste great
Directions
For the glaze:
Combine all ingredients except nuts in a saucepan, and bring to a boil. Boil until slightly thickened. Pour the glaze into a buttered 13x9 glass baking dish, and then scatter the nuts over the top.  Cover, and set aside.

For the dough:
Sprinkle yeast over warm milk with a pinch of granulated sugar. Set aside until foamy, about 5 minutes.  Melt 1/3 cup butter and whisk into yeast with vanilla and egg yolk.

Whisk the flour, 1/4 cup sugar, and salt in a large bowl.  Stir in yeast mixture to make a sticky dough.  Knead the dough on a floured work surface until soft and elastic, 6 to 8 minutes. Shape into a ball, brush with a little melted butter, and put into a large bowl. Cover with plastic wrap, and let rise at room temperature until doubled in size, about 1 hour. 

Knead the dough and reform into a ball. Return to the bowl, and cover with buttered plastic wrap. Refrigerate for 4 hours. 
In the dish, and ready to rise  for the last time
For the filling and assembly:
Roll the dough into a 10 x 18 inch rectangle. Spread soft butter over the surface. Whisk 1/2 cup sugar and cinnamon together, scatter over butter.  Roll into a long tight cylinder, pinch long edge to seal (my roll came out slightly thicker in the middle due to some lame rolling pin skills, but it was still fine!). Cut into 1 1/2 inch rolls with string or dental floss. Evenly space the rolls in the pan, over and let rise at room temperature until doubled, about 1 1/2 half hours (I let them rise for 1 1/2 hours, and then covered them and refrigerated them so I could bake them first thing in the morning). 

Preheat the oven to 350 degrees. Right before you bake them, brush with a little bit of melted butter. 

Bake until golden, 30-35 minutes.  Rest at room temperature for 10 minutes, unmold an serve warm.


Thursday, December 15, 2011

Gramma's Chicken Dijon

Gramma and Papa on their wedding day - how cute are they??
Also,  day one of the Eating Keatings family!  
This recipe is an oldy but goody in my family.  Originally done by my grandmother, who is an amazing cook. While she doesn't cook anymore, in her time, she was hard to beat! She instilled the whole family with a love of food and a love of sharing it with one another.

This is a recipe that she would always make when lots of family was visiting - it's tasty, super quick to whip up, and also freezes wonderfully.  I hadn't made this for years, and I'm so glad I've rediscovered it tonight. The smell brought me right back to my childhood evenings on 122 Pine Street.

Besides the small amount of mayo and a sprinkle of parmesan cheese, this is a relatively healthy dish, that still really satisfies the comfort food taste buds. The hubs went wild for it.  Hope you like it too!

Ingredients:

  • 6 boneless, skinless chicken breasts (trimmed up)
  • 1 cup non fat greek yogurt
  • 1/4 cup mayonaise
  • 2 T smooth dijon mustar)
  • 1 T worcestershire sauce (lee & perrins is best!)
  • 1 tsp dried thyme
  • 1 shallot, minced
  • 1/4 cup dried white wine
  • 1/4 tsp cayenne (optional for a little kick)
  • S&P
  • Grated Parmesan cheese


Heat the oven to 350 degrees.

My dijon of choice.
Grey Poupon is also good.
Place your chicken in a greased baking dish, and sprinkle with a little fresh cracked pepper and salt.

In a bowl, mix all of the ingredients together. Season with S&P to taste. Pour over the chicken breasts to coat well, and bake covered with foil for 45 minutes.  When 45 minutes is up, remove the foil, sprinkle the top of the chicken with a little bit of parmesan cheese, and broil until golden brown and bubbly. Let rest for a few minutes, and serve.

This is accompanied nicely by rice and some sort of green veggie.  I made brussels sprouts tonight - I'll share that recipe soon.

Happy eating!

Wednesday, November 30, 2011

Thank goodness for leftovers.

For me, this isn't sarcasm!!
Some days you just happen to find yourself working till 9, stressed out, behind on laundry, and two days late on your grocery store trip. On days like this, I am so thankful for a tiny bit of foresight, and my freezer.

Heating up a tasty home cooked meal is so much nicer than guilt inducing takeout. And is it possible that freezing makes something taste better? Because this was sooo yummy.

I hope that everyone had a nice, relaxing night! And if you didn't, I hope you had some yummy leftovers... and a glass of wine.

 Cheers!

Monday, November 28, 2011

Sweet Potatoes with Ginger Maple Syrup

I love the spiciness of fresh ginger
I think I've finally recovered from Thanksgiving (unfortunately ending up with a migraine today).  It was such a fun week, with my sister and her husband coming into town for Thanksgiving with friends here in DC on Thursday, and then all of us traveling up for a Turkey Day encore with family in New Jersey on Friday. 2 in a row - Woof.  A lot of great food, drink, family, friends and festivity - I just love this Holiday.

Our friends Alex & Elisa hosted at their new home on Thursday, where I had my first rotisserie turkey, and it was amazing. Flavorful, moist and tender. I've got to get their secret for it. Friday I was able to try my Grandmother's recipe for dressing (excellently prepared by my Aunt Keri) for the first time - sagey, sausagey, and oh so good.  Definitely going to be adding that to the mix the next time I make the Thanksgiving spread.

I didn't do anything fancy for either meal - on Thursday I contributed some canapés (one of the recipes here), and made three different versions of potatoes - mashed potatoes, savory sweet potatoes, and sweet sweet potatoes.  On Friday, it was an apple tart and my favorite pumpkin pie (recipe here).

The sweet sweet potatoes (i.e. candied yams, etc.) are a staple at a lot of thanksgiving tables, but never at mine growing up - we're more of a savory family. So, I decided to take a whack at making these sweet and delicious, but with a little something different. Here's what I cam up with.

Ingredients:
Maple Syrup at the source
  • 1 1/2 cups of pure Grade A Vermont maple syrup
  • 1 4 inch length of ginger, peeled and cut into strips
  • 4-5 sweet potatoes, peeled and cut into large dice
  • 1 tsp ground cinnamon
  • 1/2 stick of butter, melted
  • Brown sugar
  • S&P
  • Candied pecans (my sister made these, so I'll have to get her recipe!)
Preheat the oven to 425 degrees.

To start, prep the ginger, and put into a saucepan with the maple syrup. Turn the heat onto low and let the ginger steep in the syrup, stirring occasionally and making sure that it doesn't boil, approximately 15-20 minutes or until the syrup tastes nice and spicy

Meanwhile, prep the potatoes, and place into a large bowl.  When the syrup is ready, remove the ginger and discard, and pour it over the potatoes along with the melted butter.  Sprinkle with the cinnamon, S&P and toss to coat.  Pour into a buttered glass baking dish, large enough so that the potatoes aren't stacked too high.

Sprinkle with a little bit of brown sugar, and then bake until the potatoes are fork tender, and the sauce is beginning to caramelize. I can't remember how long this actually took - I'd start the timer at 15 minutes, and check every 5 minutes after that until done.

Serve with a sprinkle of chopped candied pecans on top.  Next time I make these, I'll probably get some of that yummy crystalized ginger, and sprinkle that on top too, to really kick up the ginger-ness of the dish. 

Thursday, November 17, 2011

Thanksgiving - Family & Food: What Could be Better?


The Original Eating Keatings!
Clockwise from top left: #1 Keri,
#2 Pat, #3 Maureen, #5 Kathleen,
#6 Laurie, #4 Nancy

As far as the modern definition goes, I have a big family. Blame it on the Catholics and the rhythm method. Blame it on the Irish. Blame it on the booze.  Or better yet, all of the above.  In any event, I LOVE my big family and wouldn't trade them for the world. My Dad is the oldest of seven awesome siblings, and my Mom is in the middle of six girls (they're the namesake Keatings).

Yes, six daughters!!  You might pity my grandfather for having so many girls, but you would be wrong.  Each and every one of them is a Daddy's girl, and he just LOVEs his girls. It's kind of crazy - they all look the same, sound the same, and are an amazing example of a true family unit. Sure, there are tiffs here and there, but when it comes down to it, they love each other, they love their husbands, their kids and/or pets, their parents, and they bring so many amazing things to the proverbial table (and the actual table, too).  

Grown Ups! L to R:#5, #3, #1,
(bride Liza), #2, #4, and #6
The next best thing about my amazing aunts, is my fantastic cousins. In a big family like ours, it's hard for outsiders to keep track of who's who.... so we use things like "I'm number three's number one" - translation: my mother is the third child, and I'm her oldest child. 

I'm getting ready for a mini-reunion with some family - my Sister and her husband are coming up from Georgia early next week, and then we're all heading up to south Jersey to meet up with Keating daughter #1, Keri, and her family - which includes Favorite Uncle, Jay,  my three awesome cousins Eliza, Margot, & Sarah (Eliza - pictured at her wedding on the right - just welcomed a new baby boy into the family!!!) and their guys. We'll be celebrating Thanksgiving a day late together, and I can't wait, especially to meet the new baby!  I'm still trying to decide on what to bring food-wise..... that will likely take some serious brainstorming this weekend. 

Come home soon, Ryan!
Thanksgiving is probably my favorite holiday.  I really appreciate the fact that this is a holiday that has been relatively uncorrupted by materialism, and that it stays true to its roots of appreciation, and gathering with those you love.  The awesome spread of food is a definite bonus though.  While this year will be great, I'll be missing my parents and littlest sister back home, as well as my west-coast family that I normally spend the holiday with.  Perhaps most importantly, our whole family will be missing my little sister's husband, Ryan, who is in the Army and currently deployed in Afghanistan.  I'll definitely be keeping all of our troops who are far from loved ones in my thoughts, but will be keeping Ryan especially in mind.  Come home safe, and soon, Ryan!!  

Mediterranean Quinoa Burgers

Clockwise starting with the pita bread, cuke loaded tzatziki,
roasted red pepper hummus, sriracha mayo (sauces sprinkled
with smoked paprika) greek olives, quinoa burger topped with
tomato and baby greens.
The husband has informed me has informed me that this is one of his favorite dinners, and it always results in lots of "MMMmm!!" grunts while he's eating.  I guess I'll take that as a compliment.  These vegetarian 'burgers' are kind of falafel-ish, and like falafel, the fun part is topping them with whatever floats your boat.  Tonight, we had cuke loaded tzatziki, roasted red pepper hummus, Sriracha mayo, sliced tomato, baby greens, and olives, and served them bun-less with some pita bread on the side.

There are so many other awesome things you can put on them. Some of our other favorites are roasted eggplant, garlic roasted tomatoes, sliced cucumber, cabbage slaw, tapenade, roasted red peppers, and taboule. Also, I'd stay away from serving these on a hamburger bun, but if you want to make a sandwich, go with a toasted english muffin or some ciabatta bread - both are really tasty!

There's one variable in this recipe, and it is the moisture content.  It directly effects how mushy the patties are, so make sure your ingredients are always as dry as they can be when you add them, make sure you don't over process the mix, and know that you might need to adjust the amount of flour (add a little more if it's too wet).

Burger Ingredients

  • 1 can garbanzo beans - drained, rinsed, and dried
  • 1 egg
  • 1 big handful of parsley, stems removed
  • 1 packed cup cooked quinoa
  • 1 T ground coriander 
  • 2 T ground Cumin
  • 2 tsp dried mint
  • 1 tsp dried ginger powder
  • 1 cup carrots, rough chopped
  • 1/2 red onion, rough chopped
  • 5 cloves garlic, chopped
  • 1/4 cup wheat flour
  • EVOO
  • S&P (be generous!)
  • 1 cup plain breadcrumbs 
Start by cooking your quinoa.  To make one cup, you'll need to boil 1 cup of water in a saucepan. Add 1/2 cup of quinoa, stir well, turn heat down to medium, cover, and let cook for 10 minutes or until all the water is absorbed.  Fluff with fork, remove from heat, and set aside to cool.

While the quinoa is cooking..... In a large sauté pan, heat small amount of EVOO over medium high heat.  Add the carrots and onion, and cook for about 5 minutes, stirring occasionally.  Add the garlic, and cook for another 3-5 minutes, or until the onions are translucent and the carrots just being to soften.  Add the coriander, cumin, mint, ginger, and a generous amount of S&P and cook for one more minute.  Remove from heat, and let cool.

In a food processor, add the garbanzo beans, egg, parsley, cooled quinoa, and cooled carrot/onion/spice mixture, flour, and a generous amount of S&P.  Pulse in short bursts just until the ingredients combine.  Don't over process, or the mixture will get pasty.  Remove the blade, and set the container on your counter next to a plate with the breadcrumbs on it.

Put a large saute pan over medium, medium high heat (like a 6 out of 10) and add enough EVOO to just coat the bottom of the pan.  With your hands, create a ball of the burger mixture, approximately an inch and a half in diameter (think honkin' meatball). Roll the ball in the breadcrumbs to coat, and then gently flatten it into a patty in your hands. Add the patty to the pan and cook without flipping until golden brown, about 3-5 minutes per side. Flip, and cook until the other side is golden brown.  You can cook several patties at once, and you'll need to add and heat oil as you go. Once pan fried, I like to keep them hot on a foil lined baking sheet in a 250 degree oven until ready to serve.

Once all patties are cooked, serve them as you like with whatever toppings sound good to you! My tzatziki recipe is below.


Cuke Loaded Tzatziki

  • 1 T very finely chopped parsley
  • 1 T very finely chopped dill
  • Juice of 1/2 lemon
  • 2 inch length of English Cucumber, finely chopped
  • 1 cup of Greek Yogurt (I like Fage)
  • S&P to taste

Mix all ingredients well, and let rest for at least 15 minute to allow flavors to marry.  Serve. Good for up to 1 week if left wrapped in the fridge.

Wednesday, November 16, 2011

Asian Style Pulled Chicken with Tatsoi Salad

I finally found the way to use the Tatsoi that I found at the Farmer's Market on Saturday, and it was awesome!  This green can be cooked or served raw (think Spinach, or baby bok choy).  The leaves have have a nice crunch and the flavor is fantastic, kind of spicy and earthy, but without any bitter notes. I'm definitely a fan of Tatsoi and am going to add this to my list of things to snatch up when they're in season.

After reading a lot about Tatsoi on the good ole interwebs, I decided that I wanted to do simple raw preparation of it, so I made a basic garden salad, and topped it with my ginger soy vinaigrette, a generous portion of sliced avocado, and some pulled chicken.  Having just returned from a business trip in North Carolina, I had pulled meat on my mind.  I decided to reinterpret pulled chicken and make it with an Asian flavor profile, and it was really tasty!  The hubs loved it and I'll definitely make it again (I think the chicken would be really great leftover and put into a wrap sandwich with lots of veggies).

All in all, the active prep time for this meal is pretty low, and it's a good 'man' salad when you add a big scoop of pulled chicken to the top. Hope you like it!

It's purdy, too
Asian Style Pulled Chicken:

  • 2 T roasted peanut oil
  • 1 tsp black sesame seeds
  • Pinch of red pepper flake (optional)
  • 2 large chicken breasts
  • 3 T Soy Sauce
  • 1/3 cup Aji Mirin Sweet Rice Wine
  • 1/4 cup Dry White Wine
  • 1 tsp minced ginger
  • 3 cloves garlic, minced
  • Fresh ground black pepper
In a medium size sauce pan, add two chicken breasts (trimmed of fat and any ickiness) and cover with water.  Set over medium high heat and simmer until the chicken is cooked through and easily breaks apart with a fork.  Remove from water, and let cool slightly.

Once cool, use your fingers and a fork to shred the chicken.  Set aside.

In a sauté pan, heat the peanut oil over medium high heat.  Add the sesame seeds, garlic, and red pepper flake and cook for about 2-3 minutes, or until fragrant but not browned, stirring frequently. Add the ginger, and cook for 1 more minute.  Next, add the shredded chicken.  Immediately add the soy sauce and both wines.  Stir well to combine and turn heat to medium low.  Cover and let the mixture simmer for 10 minutes.

Remove the cover, and turn heat to medium.  Let it cook until the majority of the liquid evaporates, stirring frequently.  Taste and adjust seasoning if necessary (you might want to add a little more soy sauce). When done, remove from heat.  Set aside so that it cools enough that won't wilt your salad when added to the top.  It's going to be sweet and savory and oh-so-tasty, with a good crunch from the sesame seeds.

Ginger Soy Vinaigrette dressing:

  • 1/4 cup roasted peanut oil
  • 2 T soy sauce
  • 3 T rice wine vinegar
  • 1 tsp sugar
  • 1/2 tsp minced ginger
  • 1/4 tsp roasted sesame oil
  • Pinch of fresh ground black pepper
  • Pinch of crushed red pepper flakes
Put all ingredients in a jar and shake well until combined (if you don't have a jar handy, you could easily whisk this up in a bowl).  Let rest for at 15 minutes to let flavors marry, and shake well before dressing your salad.  This is great to make ahead.

For the Salad:

  • 1 head of Tatsoi, leaves removed and large ones ripped into bite sized pieces
  • 1 handful of baby spring mix or baby sinach
  • 1 red bell pepper, julienned
  • 1/4 red onion, shaved
  • 1 carrot, peeled and thinly sliced
  • 1 head broccoli, broken into small florets
  • 1 avocado, sliced (I like to add this to the top of the salad once tossed and dressed)
I don't really need to put directions here - ya'll know how to make a salad I hope!

Sunday, November 13, 2011

Farfalle with Broccolini and the Ingredient "who shall not be named"

Tasty new spin on weeknight pasta
Okay, let's get right to it.  What is this unnamed ingredient?  It must be revolting to not even warrant a spot in the title!  Well, the truth is, this magic ingredient is everything but revolting, unfortunately it is tarnished with a nasty reputation.  I'm talking about Anchovies.  These greasy, briny, tiny little bony fish filets in a pull tab can have such a bad rap, and they really don't deserve it!  When used the right way, they are simple magic.  They add a depth and flavor to your food that you would not get any other way.  Major, major umami.   I urge you, I beg you, try the little suckers out with this recipe.  They really make the dish.  I promise that they do not make the dish taste fishy, and I guarantee you won't even know they're in there in the end!


This is a recipe that I adapted from a recipe of Giada's - just kicked it up a bit to be a little more complex. It's fast, easy, and oh so tasty.  I hope you give it a whirl and become an anchovy convert like me!


Ingredients:

  • 1 box farfalle (bowtie) pasta
  • 3 T butter
  • EVOO
  • 3-5 cloves garlic, minced
  • 5 anchovy filets, minced (don't skip these!!!)
  • 1/4 tsp Red pepper flakes
  • 1 scant tsp dried oregano
  • Approximately 3/4 cup seeded and diced fresh tomato
  • 1 large zucchini cut into thin crescents
  • 1 bunch broccolini, florets and top of stocks only (could substitute with 1 head's worth of broccolli florets)
  • Grated parmesan
  • S&P
  • little bit of flat leaf Italian parlsey, chopped.
Try them, you'll like them!

Set up your pasta pot with water and bring to a boil.

Melt the butter in some EVOO over medium, medium-low heat. Add the garlic and anchovies and sauté for awhile, till anchovies 'melt' but garlic does not brown. Then, add red pepper flakes to taste, oregano, black pepper and a little bit of salt (anchovies and butter already have salt, and Parmesan is salty, so don't over do it)

Then, add the zucchini and sauté for a few minutes. Next, add tomato, and turn temperature down to medium low. I let all of these ingredients cook down till kind of mushy lumpy sauce is created. Perhaps this isn't the most gourmet way to serve the zucchini, but I like it when it falls apart and can help the sauce stick to the pasta. 

While your sauté cooks down, cook your pasta in salted water. When there are 5 minutes to go till al dente is reached, add your broccolini florets and cook along with pasta for remaining time. When done, drain the pasta and florets, and immediatly add the pasta and florets to your sauté pan. Reserve 1 ladle full of pasta water. Mix well and continue stirring and cooking over medium low for 2-3 minutes so that sauce permeates pasta. Add pasta water if you want it a little saucier.

Serve with a little fresh chopped parsley and Parmesan cheese on top.

Butternut & Acorn Squash Lasagna

Squashy goodness
I'll admit it - I'm having a full blow love affair with fall foods, particularly winter squash.  I didn't do any blogging this summer, but I assure you that I was crushing on summer squash and zucchini nearly as much during that whole season.  Now that the temperatures have dropped, those hard skinned, awkwardly shaped gourds are all over my kitchen (as well as some decorative ones around the house, too.)

This lasagna has been inspired by a couple different recipes - one from Giada and one from Martha, but it ended up being my version.  Most of those versions were leaning too much on the sweet side of things for my taste.  So here's a more savory version that is sure to please.

Squash Filling:
  • 1 medium sized butternut squash, 2 acorn squash - seeded, halved, rubbed with EVOO, sprinkled with S&P, and roasted at 400 degrees until fork tender.
  • 2 medium sweet onions, chopped
  • 5 cloves garlic, minced
  • 3 T butter
  • 1 tsp dried sage
  • Pinch of cayenne pepper 
  • S&P to taste
Remove the squash from it's skins after cooking.  Mash with a fork until smooth. Meanwhile, melt the butter in a pan and sauté the onions over medium-medium high heat until they just begin to color, approximately 15 minutes.  Turn heat to medium low, and continue to cook, stirring frequently, until they reach a light caramel-y color.  Add the garlic, and continue to cook for another 5 minutes, stirring frequently.

Next, add the sage, cayenne, and S&P.  Turn heat off, and add the mashed squash.  Mash and stir well until all ingredients are well combined.  Taste, and adjust seasoning if necessary. Set aside until ready to assemble the lasagna.

Cheese Filling:
  • One 2lb container of Ricotta (either party skim or whole milk)
  • 2 eggs
  • 3/4 cup grated Parmesan
  • 1/3 cup whole milk
  • 1 tsp dried sage
  • 1 tsp dried thyme
  • Scant 1/4 cup fresh chopped parsley
  • S&P to taste
Mix all ingredients very well, and refrigerate covered until ready to assemble the lasagna.

Béchamel Sauce
  • 1/4 cup butter
  • 1/4 cup all purpose flour
  • 4 cups whole milk, warmed.
  • 1 heaping tsp fresh finely chopped basil
  • Pinch of nutmeg
  • S&P to taste
In a large saucepan, melt the butter.  Once melted, sprinkle in the flour. Whisk the mixture vigorously until smooth.  Let cook over medium heat, whisking very frequently, until the mixture starts to release a nutty smell and just starts to darken in color.  At that point, begin to add the milk in a small, steady stream, whisking furiously.  Make sure that all lumps are whisked out as you go.  Once the mixture reaches a thick liquid stage, you can add the rest of the milk more quickly, but you must continue to stir it.  Let the mixture continue to heat until it reaches a low simmer and thickens, about 5-7 minutes.  You want it to have a nice, thick, saucy consistency. Then, add the nutmeg, basil, S&P.  Taste, and adjust for seasoning. Remove from heat, cover, and set aside until ready to assemble the lasagna. 

For a quick video tutorial on making a béchamel sauce, look here

Other Ingredients:

  • 1 box of no-boil lasagna noodles (I prefer Barilla brand. The no-boil noodles save a ton of time and turn out great!)
  • 1 lb of shredded mozzarella cheese (I like Sargento brand)

To assemble the lasagna:
In a large glass baking dish, spoon enough sauce into the bottom of the pan to coat the entire bottom.  Next, add the lasagna noodles, with a very slight overlap between them. Top with a layer of the squash mixture, then more sauce on top of that.  Add the next layer of noodles, then a layer of the cheese filling, sprinkle with shredded mozzarella, and then with more sauce on top of that.  Keep alternating layers until you reach near the top of of the dish.  Finish with a layer of noodles with the béchamel sauce on top, sprinkled with shredded mozzarella and grated Parmesan.

Bake your lasagna according to the package instructions for the noodles - the Barilla brand goes into a 375 degree oven, covered with foil for 50-60 minutes, or until bubbly. Then, uncover and finish baking just until the cheese is melted and bubbly on top.

Let rest until it's warm, and serve. It's quite rich, so a small slice should probably do the trick. The hubs and I enjoyed it with a simple arugula salad on the side.

What's For Dinner?

Meal planning is an important part of my weekend.  When life get's busy with work, volunteering, social activities, and housework, it's easy to bump a good dinner to the bottom of the priority list.  I've found that just a small amount of planning on a Sunday afternoon  pays off in dividends throughout the rest of the week - having a tasty dinner is a nice way to spend some time with my husband, and having leftovers around for lunches and freezing for the really busy days, helps out a lot.

I like to check the farmer's market on Saturday to see what they have in season and new, and then spend some time perusing some of my favorite food blogs and websites for inspiration, and then putting together a list of meals that will keep us going for the week. I try to keep in mind which days are busier than others, as well as figure out which ingredients can work for more than one recipe.  Also, for my husband and me, we like to eat vegetarian a few nights a week, and also like to have something spicy and ethnic at least once a week.  Here's what I'm planning for the next seven days:

Sunday (tonight!): Vegetarian lasagna with Roasted Squash (Butternut & Acorn from the farmer's market - I'm semi obsessed with roasted squash right now, if you can't tell from the recent recipes!).  Fresh bread from the farmers market, arugula salad. The hubby is studying for a bit microbiology test, so I'm making something that tastes good after sitting around for awhile and reheated, in case he's home late.  This one will also make for some major leftovers.

Monday: Black Bean Chili with ground beef (the one night this week where we'll have red meat), corn bread. I'm always low on fresh ingredients the day before a grocery shop, and most of the ingredients for this meal come out of my pantry and freezer.

Tatsoi - my latest farmers
market discovery! the size
of a dinner plate, and very flat.
Can't wait to try it out!
Tuesday - Grocery Shopping Day:  Asian Chicken Salad with Totsoi - this cool new Asian green that I discovered at the farmers market yesterday - read more here - , I can't wait to try it out!).

Wednesday: Mediterranean Quinoa Burgers. These are fast, yummy, and vegetarian.  I top them with whatever I have in the fridge - usually that means, hummus, slices of tomato, baby spinach, cucumber, Greek yogurt, and Sriracha spicy aioli. I serve them bun-less, on an english muffin, or mushed into a pita pocket a la falafel style.

Thursday:  Thai Panang curry with tofu and shrimp, jasmine rice.

Friday: Italian Tuna Bean Salad - a no cook favorite in my family, perfect for a Friday when I'm exhausted from the work week.

Saturday:  Homemade Ravioli with squash, Marscapone and sage with brown butter sauce and parmesan. Spinach Salad.  Homemade pasta is always a bit time consuming so it's a fun meal to make on a Saturday. To save time, I'm saving some of the squash I'm roasting for the lasagna for this meal.

What are you eating this week?

Chipotle Chili with Chicken & Butternut Squash

Yummy!
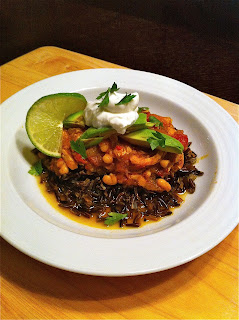
They say necessity is the mother of invention, and this is one such recipe.  I had some leftovers that I needed to use up, in this case, some roasted butternut squash and some shredded chicken breast, so I decided to make them into a chili. The squash acts as a thickener for the chili, but could be skipped.  If you don't have shredded chicken on hand, you could easily sauté some chicken before you start your onions, remove and then add in before the simmering process, or skip completely and up the beans to 2 cans for a meat free version. This is a really simple, satisfying, and spicy chili - the hubs and I really enjoyed it over wild rice. I hope you like it too!


Ingredients:
All the good stuff
  • 1 cup roasted butternut squash, fork mashed
  • 1-2 cups shredded chicken breast
  • 1/2 large red onion, chopped
  • 3 cloves garlic, minced
  • 1/2 to 1 chipotle in adobo sauce, chopped (1 full pepper makes for a very spicy stew, scale back if you're not into fiery foods, but the smokiness of the pepper is important for the flavor, so don't skip it entirely)
  • 1/4 tsp red pepper flakes (again, scale back or omit for less spice)
  • 1/2 tsp cumin
  • 2 T chili powder
  • 1  tsp ground cinnamon
  • 1 tsp black pepper
  • 1/2 tsp coarse kosher salt
  • 1 tsp Mexican oregano
  • Few dashes of Worcestershire sauce (Lee & Perrins is my preferred brand)
  • 8-10 Campari sweet tomatoes, halved
  • 1 red bell pepper, seeded and quartered
  • 1 can Habicheulas Blancas (small white beans), drained and rinsed
  • 3 cups chicken or vegetable broth (I used chicken broth)
  • 1 tsp honey
  • 1 tsp "better than bouillon" chicken
Garnish with:
  • Avocado slices
  • Fresh cilantro, chopped
  • Non-fat plain Greek Yogurt (less guilt than sour cream, and all the taste!)
  • Lime Wedge
  • Serve over rice of your liking - I used long grain wild rice

Start by roasting your peppers and tomatoes.  Heat the oven to 400 degrees.  Rub the peppers and tomatoes with some EVOO, and sprinkle with salt and pepper.  Roast on the top shelf of the oven until the skin of the peppers is blackened and the tomatoes are collapsed and beginning to caramelize, approximately 20 minutes.  When you remove them from the oven, immediately take the peppers and put them in a small bowl and cover with plastic wrap.  The steam will help them "sweat" their skins off.  While the peppers are cooling, rough chop the tomatoes and set aside.  When the peppers are cool, use a knife to scrape the skins off.  Discard skin, and rough chop the pepper flesh.  Set aside.

How the bell pepper and
tomatoes look when ready
to remove from the oven
In a dutch oven, sauté the red onion over medium heat until translucent, about 5 minutes.  Add the garlic, and sauté for another 2-3 minutes, or until fragrant.  Next, turn your heat to medium low and add the chipotle, red pepper flake, cumin, chili powder, cinnamon, black pepper, salt, and Mexican oregano.  Cook for 1-2 minutes, and then add the better than bouillon (kicks the flavor up a notch).  Let that dissolve into the mixture, and then add your chicken broth.  Stir well and be sure to scrape up any caramelized bits from the bottom of the pan.

Next, add the honey and a few dashes of Worcestershire.  Add the butternut squash, shredded chicken, tomatoes, bell peppers, and Habichuelas Blancas. Turn heat to low, cover, and let simmer for 20 minutes.

While the chili is simmering, cook your rice (if you wish to serve it over rice) according to package directions, and prepare the other garnishes.

When 20 minutes is up, taste and adjust seasoning if necessary.

Serve over rice with some slices of avocado, fresh cilantro, greek yogurt, and a squeeze of lime juice to brighten the flavor profile.  Enjoy!

Pasta with Roasted Acorn Squash and Marscapone

Squash and tomatoes, ready to roast!
I'm convinced that nearly everything tastes better roasted.  Roasted garlic, roasted tomatoes,  and roasted squash are the stars of this show.  The roasting process both intensifies and sweetens the flavors of the veggies, and when combined with the creamy Marscapone cheese and the woodsy tarragon and earthy sage, makes a delicious, rich and satisfying sauce.   It's almost mac & cheese-ish with how creamy it turns out, but with far fewer calories!

Ingredients:

  • 2 acorn squash, cut into eighths (quartered and halved again) and seeded
  • 1 heaping cup grape tomatoes
  • 1 head garlic
  • 1 sweet onion, chopped
  • 1/2 cup white wine
  • 1/4 scant tsp ground nutmeg
  • 1-2 cups chicken broth
  • 3 dollops Marscapone cheese
  • 1 T chopped fresh tarragon
  • 1 T chopped fresh sage
  • 1 lb tube style pasta, such as Cellentani or Penne 
  • EVOO
  • Coarse Kosher Salt & Fresh Ground Black Pepper


Cloves exposed, rubbed
with EVOO, ready to wrap
and roast!
Preheat your oven to 400 degrees.  While it heats, prepare your veggies for roasting.  Rub the squash with EVOO and sprinkle with S&P.  Toss the tomatoes with a little bit of EVOO, S&P. For the garlic, cut the top off so that the tops of the cloves are exposed. Rub the entire head with EVOO and then wrap in a piece of aluminum foil.  Place the squash cut side up in a glass backing dish, and sprinkle the tomatoes on top of the squash.  Place the foil wrapped garlic in a corner of the dish.  Put in the oven and roast for 30-35 minutes.  Check the garlic, the cloves should be soft.  Check the squash, it should be fork tender.  The tomatoes are done whenever the squash is done. 

While the veggies are roasting, take your chopped onion and sauté in large sauce pan (large enough to hold the pasta later on) over medium low heat in EVOO with a little bit of salt and pepper until it just starts to caramelize, approximately 20 minutes. If it starts to burn at all, turn the heat down lower.

Bring your pasta water to a boil.

When veggies are done, add tomatoes to the pan with the onion, and scoop the squash from the rinds and fork mash in a bowl.  Remove 5 cloves of the roasted garlic (save the rest wrapped in foil in the fridge to use for another recipe or delicious garlic bread), and rough chop it and add to pan with onion.  Sauté all together for 2-3 minutes, then deglaze with the white wine, making sure you scrape up all the good caramelized bits from the pan.

Add the fork mashed squash to the pan, and season with nutmeg and S&P.  Add enough chicken broth to make the squash and veggies form a thick sauce.  Turn the heat to low and let simmer.

Cook the pasta according to package directions for al-dente pasta.

Rich, thick & creamy!
When the pasta is almost done cooking, add the dollops of Marscapone and the chopped herbs to the sauce.  Mix well, and continue to simmer.

When pasta is done, drain and do not rinse.  Add into pan with sauce, and let cook on low for 2-3 minutes to allow flavors to marry and permeate the pasta. Serve with a bit of parmesan on top.

Saturday, February 26, 2011

Seared Scallops with Blood Orange Gastrique

I found some beautiful blood oranges at the market the other day, and wanted to find a fun way to use them. Today at the fish market, I saw some gorgeous scallops, and the recipe was born!

Despite a somewhat fancy name, this is actually a super easy dinner, and if you only count the active prep time, it's very quick, too.  The hubby gave this rave reviews, and it's fun to serve your man a fancy looking meal :)

For the Gastrique:
  • Juice of one blood orange
  • 1 cup of fresh orange juice
  • 1/3 cup white wine
  • 1 shallot, minced
  • Sprinkle of white pepper
  • 1/3 cup granulated sugar
Combine all of the ingredients in a sauce pan and stir to dissolve the sugar.  Put over medium high heat and bring to a boil. As soon it reaches a boil, reduce the heat to low so that the mixture simmers.  Let it simmer until it reduces by at least half (approximately 20 minutes).  Once it reaches a nice, intense color and becomes a bit syrupy, remove from the heat, add little bit of S&P, and set aside.  You can finish the sauce by whisking in 2 T of butter to make it a bit richer, if you want (but that's not necessary, or very authentic).  Now it's time for your scallops!

Scallops*:
  • 8 large diver sea scallops (4 per person is a dinner-sized portion)
  • S&P
  • Olive Oil.
Pat the scallops with paper towel until they are very dry. Then sprinkle with a bit of S&P.  Put a large sauté pan over high heat, and add enough olive oil to be able to coat the bottom of the pan.  Set your temperature to high, and let it get screaming hot (you'll see a bit of smoke coming off the oil).

As soon as this temperature is reached, put your scallops in the pan, flat side down. Make sure they aren't touching and have plenty of room between them, otherwise they will steam and won't sear well. If you need to, break this up into 2 batches.  They will splatter and sizzle and pop, so stand back!  Let them cook for 2 minutes, then flip.  Let them cook for 2 minutes on that side, and then remove and set onto your plate.  Spoon the Gastrique over them, and serve immediately.

I served a scoop of citrus salad on the side.... unfortunately only had ugly romaine hearts in the fridge... it would have been super over frisée or other crunchy mixed greens...... recipe for this:


Citrus Dressing:
  • 1/4 Cup Fresh Squeezed Orange Juice
  • 1/4 Cup Rice Wine Vinegar
  • 2 tsp granulated sugar
  • 1 tsp Dijon Mustard
  • S&P
  • 1/2 cup walnut oil
Use your favorite salad greens, and add some citrus wedges (sans membrane) and shaved red onion.  Toss well, and enjoy!

* A Note on Scallops:


When picking scallops, there are a few things to look for:
Dry or wet:  If possible, get scallops that are "dry" - a.k.a. not sitting in a bowl of liquid.  They're best when just sitting on ice.  That's because when in a liquid, the scallops tend to absorb it. The liquid is somewhat briny, and this can affect the taste of the finished product, and the increased moisture content can also make it more difficult to get a nice sear.
Color:  Get nice warm-white colored scallops.  Any uneven coloring, brownness, or graying should be avoided. Shiny is good. 
Smell:  When scallops are fresh, they will have a nice sweet, not fishy, but oceany smelll.  Ask your fish monger to hand you a scallop to let you smell it if you wish.  That's totally acceptable!
Texture:  They should always be nice and firm. 

Monday, January 31, 2011

Easy Black Bean Hummus

This afternoon I made a quick stop at one of my favorite local stores - Mom's Organic Market.  They were showcasing their organic canned black beans, and had a delicious black bean hummus to sample.  I picked up the recipe to share, definitely something I will be making soon, and I love how it's SO simple!

  • 1 can organic black beans
  • Juice of 1/2 lemon
  • 1 tsp white wine vinegar
  • 1-2 cloves garlic
  • 1/4 tsp ground cumin
  • 2 T olive or sesame oil (maybe a blend of both!)
  • Sea Salt to taste
Blend all ingredients in food processor until smooth.  Add oil or water as needed to reach desired consistency. 

For other DC area readers - if you haven't checked out Mom's before, I highly recommend it!

Tuesday, January 18, 2011

Capresé Style Soup

Maryland was hit by a bit of an ice storm last night.  While the evening started off with a scenic snowfall of about an inch, it was quickly thwarted by the bully of the meteorological world, the evil "Wintery Mix." Soon, snow had turned to slush, and slush had turned to ice, and  every outdoor surface was coated with an ice glaze.  While somewhat pretty from within my nice cozy house, it is not fun to deal with.  Thankfully, it wasn't a very severe storm - the main roads were cleared relatively quickly, and to my knowledge there weren't any downed tree or power line problems.

So, while slipping and sliding my way up my front walk today after work, I began to think about how excited I am for summer.  A food blogging friend and I were just lamenting the lack of culinary creativity that strikes us in the dead of winter, and how everything is much more fun when you can grill outside, stock up on amazingly fresh and delicious veggies at your farmers market, enjoy homegrown herbs, and more.  Craving warmer summer days, I decided to do a winter version of a summer classic, and make a fresh tomato and pesto soup - let's call it Capresé style.   While nothing can touch the awesomeness of fresh summer tomatoes, the hubby and I enjoyed a 'sneak peak' of summer flavors in a dish that was still nice and comforting on such a crummy winter day.

So without further ado, here's my Capresé Style Soup

Ingredients:

  • 2 cups grape tomatoes, sliced in half.
  • 1 cup crimini mushrooms, thinly sliced
  • 1/2 cup red bell peppers, chopped
  • 2 shallots, finely minced
  • 2 garlic cloves, finely minced
  • 2-3 chicken breasts - cooked and chopped into bite size pieces (I used a time saving rotisserie chicken!)
  • 1 box of Chicken Stock
  • 1/2 cup store bought pesto sauce (I used Trader Joe's brand)
  • 1/3 box of small tube pasta of your choice (I used mini Penne)
  • 1 T flour
  • EVOO
  • Butter
  • S&P

Directions:
Sauté the mushrooms over medium heat in a little EVOO and butter until tender and the juices have released, 3-5 minutes.  Add in the shallots and a bit of S&P and sauté for another 3 minutes. Add in the garlic and the bell pepper and sauté until the bell peppers are tender. Add in the flour, and stir well.  Cook for 3-5 minutes, stirring constantly.  The pan might get very dry, but that's okay, just keep cooking and stirring.  Next, stir in your chicken and the grape tomatoes.  Cook until the tomatoes gets soft, about 3 minutes.  Then, add in your pesto and mix well.  Add in the chicken stock as well as 1 cup of water.  Stir well, and bring up to a boil.  Add the dry pasta, and instantly reduce heat to low.  Stir occasionally, and cook until the pasta is al dente.  Super easy, and pretty quick.  Enjoy!

Wednesday, January 12, 2011

Guest Post! Stuffed Crust Pizza a lá Christy!!

Mmmm...Cheesy Delicious Crust!
Well folks, you all must be starving because I haven't blogged a recipe in AGES!  Well, what's happened to this blog? Let's see.  It all boils down to two simple thing. One, I started a part time job. And, Two - I started another one!  Suddenly my days of playing housewife and wasting away the hours cooking lavish meals for the hubby are far behind me!  With that said, I AM still cooking, just a more abbreviated version of it.

Christy and her hubs - what a
beautiful picture!!
It took a gentle nudge in the form of an offer for a guest post to get me to log back in and post tonight. The nudge came from the lovely Christy H, who happens to be my little sisters best friend!  Knowing that my sister adores her, makes me adore her as well.  She's a kindergarten teacher (what lucky kids!) as well as a devoted army wife who was by my sister's side through more than one deployment.  If that doesn't instantly endear you, just read this recipe!  This is such a fun twist on pizza, and sounds absolutely delicious.  I hope you all give it a try, I know I will!

And without further ado - here's Christy's recipe!


Home made Stuffed Crust Pizza
by Christy H.

I am not a crust fan. Usually, I eat the whole slice of pizza and the crust goes to my husband or if she's lucky enough, my dog. BUT I do love stuffed crust pizza. The cheese inside the bread...YUM! We've been pretty budget conscious around our house lately and I've been trying to make as many meals at home as I could rather than ordering out (most the time it's healthier too!). So I decided to give it a go on making our own stuffed crust pizza.

What you'll need:
  • Pizza dough (I used the recipe that came with my Kitchenaid Mixer, but use your favorite recipe, or you could probably use pre-made stuff from the store, Trader Joes has some good stuff for pretty cheap!)
  • 8 mozzarella cheese sticks - I've done this with only 4 and then cut in half vertically if you don't want it AS cheesy (or if you forgot to buy extra cheese sticks! oops) but I think it was better with the whole stick
  • Garlic powder/salt and a lil corn meal
  • Sauce and toppings for your favorite pizza

What you do:

Make your dough according to the directions. I like to spread a lil bit of garlic powder/salt and corn meal before putting down the dough. It's a nice extra flavor on your tongue when you bite in! After your dough has risen spread it out onto your pizza pan or stone. Try to make it as even as possible and reach as far to the edge as possible. I'm still trying to perfect this as you can see in the photo. What I really need is someone to teach me how to throw pizza dough!

Take one cheese stick and place it at the edge of your dough. Carefully pull towards you as you roll towards the center. The extra tension will get out air. Press the dough together where it meets. 


Continue with the other 7 sticks folding over the extra dough in between cheese sticks. You should have a new shape...what is it!? an octagon!! Yes, I teach Kindergarten. Go around and press your seams again, just to make sure your dough won't unroll when it's cooking.

Before I put my toppings on I like to sprinkle garlic powder/salt on the edges (did I mention we like garlic at our house?) Then load your pizza up with whatever you want. We had supreme pizza so it was green peppers, onions, olives and mini pepperonis (seriously the cutest things EVER!)  Just for extra security, I make sure to place the cheese over the seam to help keep it together,


Follow the directions for your pizza dough (mine was 20 minutes at 450 degrees). Cut and you are ready to eat! My husband, Jon, is the pizza cutter in our house and he likes to cut in between the sticks, but it really doesn't matter. Enjoy!!